mysql 8.0 기준

Table 12.11 Date and Time Functions

NameDescription
ADDDATE() Add time values (intervals) to a date value
ADDTIME() Add time
CONVERT_TZ() Convert from one time zone to another
CURDATE() Return the current date
CURRENT_DATE(), CURRENT_DATE Synonyms for CURDATE()
CURRENT_TIME(), CURRENT_TIME Synonyms for CURTIME()
CURRENT_TIMESTAMP(), CURRENT_TIMESTAMP Synonyms for NOW()
CURTIME() Return the current time
DATE() Extract the date part of a date or datetime expression
DATE_ADD() Add time values (intervals) to a date value
DATE_FORMAT() Format date as specified
DATE_SUB() Subtract a time value (interval) from a date
DATEDIFF() Subtract two dates
DAY() Synonym for DAYOFMONTH()
DAYNAME() Return the name of the weekday
DAYOFMONTH() Return the day of the month (0-31)
DAYOFWEEK() Return the weekday index of the argument
DAYOFYEAR() Return the day of the year (1-366)
EXTRACT() Extract part of a date
FROM_DAYS() Convert a day number to a date
FROM_UNIXTIME() Format Unix timestamp as a date
GET_FORMAT() Return a date format string
HOUR() Extract the hour
LAST_DAY Return the last day of the month for the argument
LOCALTIME(), LOCALTIME Synonym for NOW()
LOCALTIMESTAMP, LOCALTIMESTAMP() Synonym for NOW()
MAKEDATE() Create a date from the year and day of year
MAKETIME() Create time from hour, minute, second
MICROSECOND() Return the microseconds from argument
MINUTE() Return the minute from the argument
MONTH() Return the month from the date passed
MONTHNAME() Return the name of the month
NOW() Return the current date and time
PERIOD_ADD() Add a period to a year-month
PERIOD_DIFF() Return the number of months between periods
QUARTER() Return the quarter from a date argument
SEC_TO_TIME() Converts seconds to 'hh:mm:ss' format
SECOND() Return the second (0-59)
STR_TO_DATE() Convert a string to a date
SUBDATE() Synonym for DATE_SUB() when invoked with three arguments
SUBTIME() Subtract times
SYSDATE() Return the time at which the function executes
TIME() Extract the time portion of the expression passed
TIME_FORMAT() Format as time
TIME_TO_SEC() Return the argument converted to seconds
TIMEDIFF() Subtract time
TIMESTAMP() With a single argument, this function returns the date or datetime expression; with two arguments, the sum of the arguments
TIMESTAMPADD() Add an interval to a datetime expression
TIMESTAMPDIFF() Subtract an interval from a datetime expression
TO_DAYS() Return the date argument converted to days
TO_SECONDS() Return the date or datetime argument converted to seconds since Year 0
UNIX_TIMESTAMP() Return a Unix timestamp
UTC_DATE() Return the current UTC date
UTC_TIME() Return the current UTC time
UTC_TIMESTAMP() Return the current UTC date and time
WEEK() Return the week number
WEEKDAY() Return the weekday index
WEEKOFYEAR() Return the calendar week of the date (1-53)
YEAR() Return the year
YEARWEEK() Return the year and week

참고

https://dev.mysql.com/doc/refman/8.0/en/date-and-time-functions.html#function_adddate


MySQL :: MySQL 8.0 Reference Manual :: 12.7 Date and Time Functions

12.7 Date and Time Functions This section describes the functions that can be used to manipulate temporal values. See Section 11.2, “Date and Time Data Types”, for a description of the range of values each date and time type has and the valid formats

dev.mysql.com

조건

flask 환경에서 in 을 사용하여 검색

방법

flask에서 변수를 받을때 리스트 형태( getlist('ip_group[]' )로 받음

sql 쿼리에 매개변수 전달 시, 리스트 형태를 전달

[html]

<select class="select2" multiple="multiple" name="ip_group[]" id="ip_group" />
  <option value="127.0.0.1">127.0.0.1</option>
  <option value="127.0.0.2">127.0.0.2</option>
</select>


[js]

var ip_group = $('#ip_group').val();

$.ajax({
        url:'/project/server_info',
        type:'POST',
        data: {ip_group:ip_group},
        success: function(data){
           showAlert('Server Info', data.info, 2, 2000);
       }     


[python + flask]

@project_blueprint.route('project/server_info', methods=['POST'])
@login_required
def project_server_info():
    ip_group = request.form.getlist('ip_group[]')
    
    ql = text('select a, b, c, d, e from tblServer where ip in :ip_group')
    connection = db.session.connection()
    results = db.engine.execute(sql, ip_group=ip_group)
    
    if results != None:
        details = []
        
        for r in results:
            details.append(r[0])
            details.append(r[1])
            details.append(r[2])
            details.append(r[3])
            details.append(r[4])
            
        return jsonify(details=details)

참고

https://stackoverflow.com/questions/8603088/sqlalchemy-in-clause

문제

MySQL의 like 조건에서 \가 포함된 경우 원하는 형태로 조회가 되지 않음

해결

조건

title 컬럼의 \m가 포함된 형태로 검색 ( 검색 내용에 \ 가 포함 )

1. \를 두개 더 붙인다

where title like '%\\\m%'


2. escape를 사용
   기본적으로 escape가 \로 설정되어 있음. 이걸 다른 문자로 변경(예제는 | 를 사용)

where title like '%|m%' escape '|'

참고

https://m.blog.naver.com/PostView.naver?isHttpsRedirect=true&blogId=leokevin&logNo=220645049628

현상

동일한 OS 버전 / 동일한 MSSQL 버전 / 동일한 구조 / 동일한 요청량 

동일한 조건이지만 트랜잭션 로그 및 로그 백업 파일의 사이즈가 약 8배 차이가 나는 경우

원인

Physical Disk Sector 크기의 차이

기존에는 Physical Disk Sector 사이즈를 512 Byte를 사용하였지만, 최근 H/W 스펙이 올라가며 4096 Byte를 디폴트로 설정되어 구성되는 경우가 있음.


확인

명령프롬포트(CMD)를 관리자모드로 실행하여 아래 명령어 실행

fsutil fsinfo ntfsinfo yourLogDrive:
fsutil fsinfo sectorinfo yourLogDrive:

------------- 실행 예

C:\WINDOWS\system32>fsutil fsinfo ntfsinfo D:
NTFS 볼륨 일련 번호 :        0x???????????????
NTFS 버전      :                3.1
LFS 버전       :                2.0
총 섹터     :                1,953,519,615  (931.5 GB)
총 클러스터    :                  244,189,951  (931.5 GB)
사용 가능한 클러스터     :                  217,448,760  (829.5 GB)
예약된 총 클러스터 :                  5,087  ( 19.9 MB)
저장소 예약을 위해 예약됨 :                 0  (  0.0 KB)
섹터당 바이트  :                512
실제 섹터당 바이트 :        4096
클러스터당 바이트 :                4096


C:\WINDOWS\system32>fsutil fsinfo sectorinfo D:
LogicalBytesPerSector:                                 512
PhysicalBytesPerSectorForAtomicity:                    4096
PhysicalBytesPerSectorForPerformance:                  4096
FileSystemEffectivePhysicalBytesPerSectorForAtomicity: 4096
장치 맞춤:                                      정렬됨(0x000)
장치 파티션 맞춤:                         정렬됨(0x000)
일반 검색 수행
자르기 지원 안 됨
DAX 지원 안 함
씬 프로비저닝되지 않음

C:\WINDOWS\system32>


PhysicalBytesPerSector Transaction Log I/O간의 관계

SQL Server transaction log 파일은 physical sector-aligned boundary  생성되며, sector-aligned sizes  sector-aligned boundaries  데이터가 쓰여집니다.
, PhysicalBytesPerSector 크기에 따라 IO 단위가 달라지며,  값이 512 bytes  경우 트랜잭션 로그는 512 Bytes – 60KB 단위로 저장  있습니다.
또한 PhysicalBytesPerSector 크기가 4KB 경우 4 KB – 60KB 단위로 저장  있습니다.

현상

powershell의 invoke-sqlcmd를 사용하여 DB 쿼리를 실행하는 도중 강제 종료

에러 내용

invoke-sqlcmd : Execution Timeout Expired.  The timeout period elapsed prior to completion of the operation or the
server is not responding.

원인

쿼리 실행 timeout 설정을 하지 않아, 쿼리 실행 시간이 Default 30초를 초과하여 종료되는 현상

해소

-Querytimeout 옵션으로 쿼리 실행 가능 시간을 설정

-- Query Timeout 제한 없음 : 0
Invoke-Sqlcmd -ServerInstance "$serverInstance" -Querytimeout 0 -Query "Select * from ...."

참고

https://stackoverflow.com/questions/52545013/getting-execution-timeout-expired-running-sql-server-backup-through-invoke-sql/56991850


에러 내용

데이터베이스 보안 주체는 데이터베이스의 스키마을(를) 소유하며 삭제할 수 없습니다

(Microsoft SQL Server, 오류: 15138)


Msg 15110, Level 16, State 1, Line 14

The proposed new database owner is already a user or aliased in the database.


원인

변경하려는 계정이 이미 DB에 할당되어 있기 때문에

해소

DB의 기존 소유자를 삭제하는것이 아니라,

DB에 소유자을 변경하려는 계정을 삭제 후 실행

만약 스키마 정보에 삭제하려는 계정이 매칭되어 있다면, 변경 후 진행

USE TestDB;
DROP USER Test_srv;
--15138 오류가 난다면

select * from sys.schemas where principal_id = user_id('Test_srv');
-- 삭제하려는 아이디로 매핑된 스키마가 있는지 확인

ALTER AUTHORIZATION ON Schema::db_owner TO dbo;
-- db_owner의 소유자 정보를 dbo로 변경

-- add it back in AND change the dbowner
ALTER AUTHORIZATION ON DATABASE::TestDB TO Test_srv;    
-- DB 소유권 변경

참고

https://tori0712.tistory.com/5

http://www.sqlfingers.com/2017/07/sql-server-failure-to-change-database.html


commands

telegram 대화창에 /명령 형태로 전달

/dm_oncall 메시지를 python 코드로 확인 후 message 전달

--------------

@bot.message_handler(commands=['dm_oncall'])
    def trigger(message):
        print("## bot.message_handler dm_oncall message => ", message)
        print("## bot.message_handler dm_oncall message.text => ", message.text)

        cmd = message.text
		
		#message send 
		msg_text = """ Select Day """
		bot.send_message(message.chat.id, msg_text)
		
		#button message send 
        button_list = show_button(["Yesterday", "Today", "Tomorrow"],"oncall", 1)
        bot.send_message(message.chat.id, "당직을 확인할 날짜를 선택하세요", reply_markup=button_list)

call_back

telegram의 대화가 출력되는 부분에 버튼 형태로 전달

버튼이름은 대화창에 출력되고, call_back 변수에 지정한 메시지는 대화창에 보여지지 않고 백그라운드에서 python에서 mssage를 캡쳐하여 처리 가능

php 코드로 telegram에 버튼형태로 call_back에 message 추가하여 전달

---------

$body = file_get_contents("php://input");
$obj = json_decode($body);
$bot_query = 'https://api.telegram.org/bot'.$obj->bot_token;
$chat_id = $obj->chat_id;

# send text
$text = 'Keyboard message test !!';

$keyboard = array(
    "inline_keyboard" => array(
        array(
            array(
                "text" => "Manager",
                "callback_data" => "/manager test"
            )
        )
    )
);
$keyboard = json_encode($keyboard, true);

$sendto = $bot_query.'/sendMessage?chat_id='.$chat_id.'&parse_mode=HTML&reply_markup='.$keyboard.'&text='.urlencode($text);

$response = file_get_contents($sendto);

Keyboard Button

telegram의 대화창에 아닌, 메시지 입력창에 버튼형태로 메시지를 전달


python 코드로 메시지 입력창에 버튼 형태로 전달

-----------

import telebot
from telegram import InlineKeyboardButton, InlineKeyboardMarkup, KeyboardButton, ReplyKeyboardMarkup

token = '14????????:XXXXXXX_XXXXX-XXXXXXXXXXXXXXX'
bot = telebot.TeleBot(token)


@bot.callback_query_handler(func=lambda c: "manager" in c.data.split(",")[0])
def manager_callback(call):

    print("## bot.callback_query_handler call.data => ", call.data)
    print("## bot.callback_query_handler call.message => ", call.message)

    try:
        data_selected = call.data

        data_oncall_Yesterday = '/dm_oncall ,Yesterday'
        data_oncall_Today = '/dm_oncall ,Today'
        data_oncall_Tomorrow = '/dm_oncall ,Tomorrow'
        data_oncall_Cancel = '/Cancel'

        main_menu_keyboard = {"keyboard":[[data_oncall_Yesterday],[data_oncall_Today],[data_oncall_Tomorrow],[data_oncall_Cancel]],"resize_keyboard": True,"one_time_keyboard": True}
        print("## main_menu_keyboard => ", main_menu_keyboard)

        bot.send_message(chat_id=call.message.chat.id, text='Select Menu.', reply_markup=json.dumps(main_menu_keyboard))

    except BaseException as e:
        print("## [Exception] manager_callback ==> ",str(e))


참고

https://blog.psangwoo.com/coding/2018/08/20/python-telegram-bot-4.html


용어

계정 : 하나의 주체입니다.  
사용자 혹은 bot등이 여기 해당됩니다.

채널 : 열린 채팅방입니다.
그룹이 단순히 여러명이 모여 대화를 나누는 곳이라면 여기에는 그 이상의 기능이 가능합니다.  
채널을 공개하여 여러 사람이 들어올 수도 있으며 관리자등을 지정하고 이들만 채팅이 가능하도록 하는 등 알림용도로도 사용이 가능합니다.  

BotFather : bot을 생성, 관리할 수 있는 계정(bot 형태)입니다.  
BotFather과 대화로 bot을 생성하고 여러 기능을 설정할 수 있습니다.

telegram 대화상대에서 BotFather를 검색하여 추가해 줍니다

시작

/start

bot 이름 및 아이디 설정

/newbot

순서 : 이름 입력 -> 아이디 입력

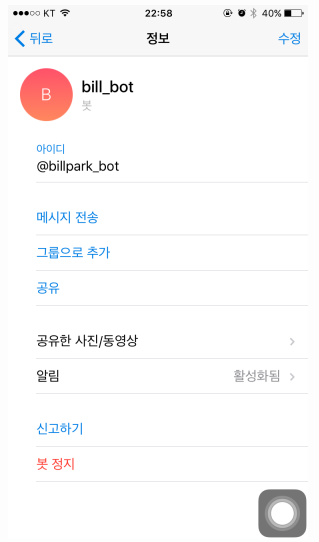
이름 : bot의 이름으로, 채팅방에서 보이는 이름입니다. ( 예제는 bill_bot )

아이디 : username으로 변수로 처리되며, 아이디에 있는 @로 시작하는 부분이 username입니다.

           봇을 검색할 때 사용됩니다.

bot 생성 과정

마지막에 검은색 박스로 쳐진 부분이 있습니다.

이 부분은 token(토큰)으로 xxxx:yyyyyy 형태로 이루어 져 있습니다.

토큰이 있으면 해당 계정(여기서는 봇)의 권한을 거의 전부 사용할 수 있다고 보시면 됩니다.

그렇기에 관리를 해주시는 것이 필수입니다.

python으로 넘어가기 전에 한가지 준비를 해주어야 합니다.

현재 봇은 생성되었지만 저에게 메세지를 보낼 수 없습니다.

왜냐하면 제가 누군지 모르니까요.

그렇기에 봇에게 먼저 말을 걸어보고 파이썬으로 넘어가도록 하겠습니다.

BotFather를 추가했던 것 처럼 봇의 아이디를 검색하여 채팅을 시작합니다.

메세지는 아무거나 보내도 됩니다.


telegram python api 설치

$ pip install python-telegram-bot --upgrade

python 으로 message 받기

import telegram   #텔레그램 모듈을 가져옵니다.

my_token = '여기에 토큰을 입력해 주세요'   #토큰을 변수에 저장합니다.

bot = telegram.Bot(token = my_token)   #bot을 선언합니다.

updates = bot.getUpdates()  #업데이트 내역을 받아옵니다.

for u in updates :   # 내역중 메세지를 출력합니다.

print(u.message)

응답(메세지는 이렇게 많은 데이터를 담고 있습니다. 일부분은 사생활 보호를 위해(?) 삭제하였습니다.)

{
  'caption':'',
  'text':'봇 테스트',
  'new_chat_title':'',
  'entities':[
  ],
  'delete_chat_photo':False,
  'message_id':6,
  'chat':{
    'username':'보호',
    'title':'',
    'first_name':'보호',
    'id':보호,
    'last_name':'보호',
    'all_members_are_admins':False,
    'type':'private'
  },
  'group_chat_created':False,
  'from':{
    'first_name':'보호',
    'id':보호,
    'last_name':'Park',
    'type':'',
    'username':'bill_park'
  },
  'supergroup_chat_created':False,
  'date':1481120854,
  'migrate_from_chat_id':0,
  'migrate_to_chat_id':0,
  'channel_chat_created':False,
  'new_chat_photo':[
  ],
  'photo':[
  ]
}

u.message에서 텍스트(내용), 누구한테서 왔는지, 발신자의 id(username과 동일하게 사용됩니다.)등을 볼 수 있습니다.

만약 수신한 텍스트(내용)만 보려면 u.message.text 를 사용하면 됩니다.

이제 메세지를 보내볼 차례입니다.

메세지를 보내기 위해서는 보낼 상대의 username - api에서 말하는 chat_id를 알아야 합니다.

bot을 테스트 할 때 메세지를 보내 두었다면 또 위의 예제가 잘 실행되었다면 u.message.chat.id 로 메세지를 보낸 사람의 chat_id를 알아낼 수 있습니다.

chat 그룹 안의 id부분이 chat_id를 나타내고 있습니다.

chat_id = bot.getUpdates()[-1].message.chat.id #가장 최근에 온 메세지의 chat id를 가져옵니다

bot.sendMessage(chat_id = chat_id, text="저는 봇입니다.")

그러면 bot이 메세지를 보낸 것을 확인할 수 있습니다.

참고

https://blog.psangwoo.com/coding/2016/12/08/python-telegram-bot-1.html

정보

Core별 MSSQL 'max worker threads' Default 값 설정

Core 기준 : 논리 코어


'max worker threads' 설정 값 확인

  • SELECT max_workers_count FROM sys.dm_os_sys_info
  • sp_configure 'max worker threads'

기준

예시

CPU : 물리 코어 24 ( 논리 코어 48 )

512 + (( 48 - 4 ) * 16 ) = 1,216


 참고 : https://blog.sqlauthority.com/2018/06/15/sql-server-optimal-value-max-worker-threads/

현상

특정 서비스가 실행중이지 않으면 Windows의 psexec를 사용할때 아래 에러가 발생


에러 내용

The network name cannot be found

필요 서비스

Server (LanmanServer) must be running
TCP/IP NetBIOS Helper (lmhosts) must be running
UpnP Device Host -> 수동
SSDP Discovery -> 수동 -> 러닝

참고 : https://superuser.com/questions/1158722/psexec-requirements-on-local-computer


to Top