---  MEMORY  ----

 * innodb buffer pool size를 크게 가져갈수록 디스크 IO를 줄일수 있음
 * 일반적으로 OS의 70&~80% 사용


---  CPU  ----

 * 하이퍼 스레딩 활성화
 * 일반적으로 CPU보다는 memory 및 Disk IO를 올리는것이 성능 향상에 효과적
 * MySQL 버전에 따른 코어수 제한 
   - MySQL 5.1 : ~ 4코어 
   - MySQL 5.5 : ~ 16코어 
   - MySQL 5.6 : ~ 36 쓰레드(Core)
   - MySQL 5.7 : ~ 64 쓰레드(32 Core-HT)
   - MySQL 8.0 : ~ 100 쓰레드(48 Core-HT)


---  Disk  ----

 * SSD, NVMe 사용시 innodb_page_size=4K, innodb_flush_neighbors=0 로 사용을 추천
 * innodb datadir, tmp 파일 및 undo 로그 모두 Ramdom IO가 발생함으로 SSD로 할당
 * 로그(빈로그 등등)의 경우 Sequnential IO가 발생함으로 디스크로 할당
 * innodb_io_capacity
   - innodb가 사용 가능한 I/O 대역폭
   - 너무 큰 값을 사용한다고 해서 많은 이점이 있지는 않음( 20000 이상은 권장되지 않음 )
   - 쓰기 작업이 많은 시스템은 높은 값이 유리 ( Ex LogDB )
   - 쓰기 작업이 적은 시스템은 낮은 값이 유리
 * innodb_io_capacity_max
   - innodb가 사용 가능한 I/O 최대 대역폭 
   - 일반적으로 innodb_io_capacity 값의 두배로 설정
 

---  OS  ---- 

 * MySQL은 Linux 에 최적화 되어 있다. 
 * MySQL 이외에 OS에서 설정을 해줘야되는 부분
   - ulimit -n, 파일 수 제한 (connections, open tables, ...)
   - ulimit -u, 스레드 수 제한 (connections, InnoDB background threads, event scheduler, ....)
 * NUMA 기반 서버의 경우 innodb_numa_interleave를 1로 설정 
   - mysql과 os의 numa 설정이 다른경우, 노드간 메모리 사용 불균형으로 swap이 발생하여 성능 이슈가 발생할 가능성이 있음.
 * InnoDB를 사용하는 경우 OS의 파일시스템 캐시를 사용하지 않는다.( 더블 버퍼링을 막아 메모리를 효율적으로 사용 )
   - set inndbo_flush_method=O_DIRECT
   - innodb pool이 훨씬 고도화된 형태로 동작

---  ETC   ---

 * innodb_log_file_size(redo log 사이즈)
   - 크게 가져 갈수록 체크포인트 동작이 덜 필요하여 성능에 좋으나, 너무 크게 설정하는 경우 DB 복구 시간이 느려짐.
   - 운영서버 최소 512MB 이상 권장.   
 * innodb_log_files_in_group(리두 로그 파일 갯수)
   - Default는 2이지만 일반적으로 3으로 운영
 * skip-name-resolve
   - client에서 server로 접속시 dns lookup 과정을 생략
   - dns 서버가 느리거나 장애 발생시 DB 접속문제가 발생하는 것을 해결할 수 있음.
 * innodb_write_io_threads / innodb_read_io_threads
   - SHOW ENGINE INNODB STATUS 에서 지연된 쓰기/읽기 요청이 64개 이상인 경우 값을 올려주는것이 좋음.
 * innodb_log_file_size
   - 로그 파일 크기
   - innodb_buffer_pool_size의 25% 정도로 유지
   - 이 값이 클수록 버퍼 풀에서 체크포인트 발생 빈도가 낮음.
   - 이 값이 클수록 크래시 발생시 복구가 그만큼 느려짐.


---  ACID 유지  ---   

 * innodb_flush_log_at_trx_commit = 1 
   - commit마다 리두 로그에 기록하고 디스크에 flush
   - ACID가 보장이 되지만, 디스크 I/O가 높음
   - 성능 위주 DB로 설정하고 싶은 경우 0
 * sync_binlog = 1
   - 트랜잭션이 커밋되기 전에 이진 로그를 디스크에 동기화
   - 정전 및 운영 체제 충돌에도 ACID가 보장되지만, 디스크 I/O가 높음
   - 성능 위주 DB로 설정하고 싶은 경우 0
 * innodb_doublewrite = 1
   - innoDB의 페이지를 쓰기 전에 버퍼 풀에서 플러시된 페이지를 중복해서 저장
   - MySQL Crash 복구 중에 이중으로 쓰여진 버퍼에서 페이지 복사본을 찾아 복구 진행
   - 데이터 무결성을 유지할 수 있으나, 이중으로 데이터를 기록하여 I/O가 높음. (이중으로 기록 하지만 2배의 I/O가 발생하지는 않음)
   - 성능 위주 DB로 설정하고 싶은 경우 0   


---  Buffer per Client Connections  ---

 * connection(세션)당 할당되는 버퍼들 
   - read_buffer_size : Sequnential scan (full table scan)을 사용할 때 사용하는 버퍼 
   - read_rnd_buffer_size : 정렬 작업후, 정렬된 순서대로 데이터를 다시 읽어 들일 때 사용하는 버퍼 
   - join_buffer_size : 인덱스를 사용하지 않는 조인에 사용되는 버퍼, Session level에서 join 단위로 생성
   - sort_buffer_size : 인덱스를 사용하지 않는 정렬에 사용하는 버퍼 
   - binlog_cache_size (if binary logginigs is enabled)
 * connection이 많을 경우 이 버퍼들이 메모리를 점유하기 때문에 크게 세팅하면 안된다.
   - 만약 크게 필요한 경우가 있다면 필요한 세션에서만 크게 잡아서 사용한다. 


참고

https://iamwhat.tistory.com/entry/MySQL-%ED%8F%AC%ED%8D%BC%EB%A8%BC%EC%8A%A4-%ED%8A%9C%EB%8B%9D


현상

서비스 도중 swap을 사용하여 서비스 지연발생


원인

OS상 numa가 활성화 되어 있으나 mysql에서는 사용하지 않도록 설정되어, node간 균등하지 않게 memory를 사용함.

memory를 많이 사용한 node에서 memory가 부족하다고 판단하여 swap을 사용하여 처리 지연 발생


분석

swap 사용 유무 체크

  3.4G swap 사용중

~]# free -h
              total        used        free      shared  buff/cache   available
Mem:            62G         53G        3.6G        3.1G        4.9G        4.7G
Swap:          4.0G        3.4G        645M

OS numa 사용 확인
  numa를 사용하는 경우 node 0, node 1 두개로 표현됨
  아래 경우는 OS상 numa를 사용하는 형태
  node 0 free : 208MB
  node 1 free : 3123MB

~]# numactl --hardware
available: 2 nodes (0-1)
node 0 cpus: 0 1 2 3 4 5 6 7 8 9 10 11 12 13 14 15 32 33 34 35 36 37 38 39 40 41 42 43 44 45 46 47
node 0 size: 32436 MB
node 0 free: 208 MB
node 1 cpus: 16 17 18 19 20 21 22 23 24 25 26 27 28 29 30 31 48 49 50 51 52 53 54 55 56 57 58 59 60 61 62 63
node 1 size: 32767 MB
node 1 free: 3123 MB
node distances:
node   0   1
  0:  10  21
  1:  21  10

numa 메모리 실제 사용량 확인
  Active(anon)이 App에서 할당하여 사용하는 메모리
  아래는 20G, 15G로 불균현 확인됨
  node 0 : 20G 사용중 8G Free
  node 1 : 15G 사용중 8G Free

~]# numastat -cm

Per-node system memory usage (in MBs):
                 Node 0 Node 1 Total
                 ------ ------ -----
MemTotal          32436  32768 65204
MemFree            8271   8287 16558
MemUsed           24165  24481 48646
Active            20294  16002 36296
Inactive           2359   7289  9648
Active(anon)      20275  15289 35564
Inactive(anon)     2338   6588  8926
Active(file)         19    713   732
Inactive(file)       21    701   723
Unevictable           0      0     0
Mlocked               0      0     0
Dirty                 0      0     0
Writeback             0      0     0
FilePages           126   5531  5657
Mapped                1    114   115
AnonPages         22528  17760 40288
Shmem                 1   3205  3206
KernelStack           7     38    46
PageTables           43     69   112
NFS_Unstable          0      0     0
Bounce                0      0     0
WritebackTmp          0      0     0
Slab                206    210   416
SReclaimable        144     66   210
SUnreclaim           62    144   206
AnonHugePages         2      0     2
HugePages_Total       0      0     0
HugePages_Free        0      0     0
HugePages_Surp        0      0     0

mysqld에서 사용하는 numa 메모리 확인
  mysql pid 확인 --> mysql
  node 0 : 22G
  node 1 : 17G

~]# ps -ef | grep mysql
mysql    50416     1  0 Mar03 ?        00:00:00 ~~~/mysql/bin/mysqld_safe --defaults-file=~~~/my.cnf --pid-file=~~~mysql.pid
mysql    51489 50416  7 Mar03 ?        11-03:43:53 ~~~/mysql/bin/mysqld --defaults-file=~~~/my.cnf --basedir=~~~/mysql --datadir=~~~/data/ ~~~~~~( 실행 옵션 )~~~~~~~~~

~]# numastat 51489

Per-node process memory usage (in MBs) for PID 51489 (mysqld)
                           Node 0          Node 1           Total
                  --------------- --------------- ---------------
Huge                         0.00            0.00            0.00
Heap                         9.57           13.82           23.39
Stack                        0.00            0.02            0.02
Private                  22322.57        17031.40        39353.97
----------------  --------------- --------------- ---------------
Total                    22332.15        17045.23        39377.38

node별 메모리 사용량 확인

  node0은 local_node사용이 높고
  node1은 other_node사용이 높음

 ~]# numastat
                           node0           node1
numa_hit              3671867451     16116171368
numa_miss               47375279     12004935107
numa_foreign         12004935107        47375279
interleave_hit             20488           19934
local_node            3671943494     16124076268
other_node              47299236     11997030207

MySQL numa 설정 확인

  innodb_numa_interleave OFF 로 설정되어 있지 않음

  만약 ON으로 변경 시, mysql 재시작 필요

mysql> show variables like '%numa%';
+------------------------+-------+
| Variable_name          | Value |
+------------------------+-------+
| innodb_numa_interleave | OFF   |
+------------------------+-------+
1 row in set (0.00 sec)

OS numa policy 확인
  default 청잭으로 numa 사용중 ( default 정책의 경우 app이 설치된 node를 우선적으로 할당하는 구조 )
  cpu는 64개

~]# numactl --show
policy: default
preferred node: current
physcpubind: 0 1 2 3 4 5 6 7 8 9 10 11 12 13 14 15 16 17 18 19 20 21 22 23 24 25 26 27 28 29 30 31 32 33 34 35 36 37 38 39 40 41 42 43 44 45 46 47 48 49 50 51 52 53 54 55 56 57 58 59 60 61 62 63
cpubind: 0 1
nodebind: 0 1
membind: 0 1

numa 정책 옵션 설정
  bind : 특정 node 에서 메모리를 할당 받도록 강제하는 정책
  preferred : 특정 node 에서 메모리를 먼저 할당 받도록 하는 정책, 해당 node 메모리가 부족할 경우 다른 node 에서 할당
  interleave : 여러 node 에서 균등하게 할당받도록 하는 정책

Option
Descriptions
--membind=nodes, -m nodes
지정된 노드에 있는 메모리만 할당
해당 노드 메모리가 모두 차면 swap이 발생한다.
--cpunodebind=nodes, -N nodes
지정된 노드에 있는 CPU에서만 프로세스가 돌아가도록 설정
메모리 할당도 해당 노드해서만 이루어진다. 메모리의 지역성으로 성능이 올라갈 수 있지만, 반대쪽 노드의 CPU를 잘 활용하지 못하는 단점이 있다.
membind 보다 장점은 더이상 지정된 노드에 메모리가 없으면 다른 노드의 메모리를 활용한다는 점이다.
--physcpubind=cpus, -C cpus
cpunodebind 와 다른점은 노드를 지정하지 않고 CPU 번호를 지정한다.
즉 node0, node1에 있는 CPU들을 지정할 수 있다.
--preferred=node
지정된 노드에 있는 메모리를 우선적으로 할당
membind와 차이점은 지정된 노드의 메모리가 차면 다른 노드의 메모리를 활용한다. 상황에 따라서는 cpunodebind 와 다르지 않게 동작할 수도 있다.
--interleave=nodes, -i nodes
지정된 여러 노드에서 공평하게 메모리를 할당 (라운드로빈)
all 로 하면 모든 노드로 분배된다.
예제)
numactl --physcpubind=+0-4,8-12 myapplic arguments Run myapplic on cpus 0-4 and 8-12 of the current cpuset.
numactl --interleave=all bigdatabase arguments Run big database with its memory interleaved on all CPUs.
numactl
--cpubind=0 --membind=0,1 process Run process on node 0 with memory allocated on node 0 and 1.
numactl
--cpubind=0 --membind=0,1 -- process -l Run process as above, but with an option (-l) that would be confused with a numactl option.
numactl
--preferred=1 numactl --show Set preferred node 1 and show the resulting state.
numactl
--interleave=all --shmkeyfile /tmp/shmkey Interleave all of the sysv shared memory region specified by /tmp/shmkey over all nodes.
numactl
--offset=1G --length=1G --membind=1 --file /dev/shm/A --touch Bind the second gigabyte in the tmpfs file /dev/shm/A to node 1.
numactl
--localalloc /dev/shm/file Reset the policy for the shared memory file file to the default localalloc policy.


대응

1. OS와 MySQL 둘다 numa를 사용하거나, 사용하지 않도록 설정을 맞추어줌

    >> OS 설정 변경을 위해서는 장비 재시작, MySQL 설정 변경을 위해서는 DB 재시작이 필요함.

          서비스 도중이라, 이후 점검시 진행

2. OS 물리 메모리 free공간을 확보.
    >> 배치량이 많지 않아, MySQL memory buffer pool을 줄여 물리 메모리 공간 확보

3. numa 사용으로 불균등하게 메모리가 사용되어 swap이 발생함.
    cpu와 memory를 효율적으로 사용하지 못하겠지만 최대한 swap을 사용하지 않도록 하기 위해 아래 설정을 실행

    numactl --interleave=all mysqld


참고

https://m.blog.naver.com/PostView.naver?isHttpsRedirect=true&blogId=sory1008&logNo=221222077917

설명

javascript로 새로운 html page를 get 혹은 post 방식으로 오픈


방법

post

// html
<form id="post_form" name="post_form">
    <input type="text" id='param1' name='param1' value="bb">
    <input type="text" id='param2' name='param2' value="aa">
    <input type="text" id='param3' name='param3' value="oo">
</form>


// javascript
var post_form = document.post_form;
var url = '/project/post_test'
window.open('','project_post')

post_form.action = url;
post_form.method="post";
post_form.target = 'project_post' 
post_form.param1 = 'banana'
post_form.param2 = 'apple'
post_form.param3 = 'orange'

post_form.submit(); 

get

// html


// javascript
var param1_val = 'banana' 
var param2_val = 'apple' 
var param3_val = 'orange' 
window.open('/project/get_test?param1='+param1_val+'&param2='+param2_val+'&param3='+param3_val);

참고

https://milkye.tistory.com/354

내용

html page의 url 정보에서 parameter값을 추출


방법

getParam 함수를 등록하여, 파라미터명으로 값을 조회

// param값을 조회하는 함수 등록
function getParam(sname) {

    var params = location.search.substr(location.search.indexOf("?") + 1);
    var sval = "";
    params = params.split("&");
    for (var i = 0; i < params.length; i++) {
        temp = params[i].split("=");
        if ([temp[0]] == sname) { sval = temp[1]; }
    }
    return sval;
}

// 테스트 URL : http://www.test.com/test.html?param1=apple&param2=banana&param3=orange

// 호출
console.log(getParam("param2"));
console.log(getParam("param1"));
console.log(getParam("param3"));

// 결과
"banana"
"apple"
"orange"

참고

https://electronic-moongchi.tistory.com/82


내용

html div 내부에 정의된 page를 code형태로 추출하여 클립보드로 복사하는 기능


방법

html

<div id="test_div" name="test_div">
      ~~~~~~~~
</div>


javascript

function page_code_copy(){

    file = window.location.href;

    var copyText = document.getElementById("test_div");

    var textArea = document.createElement("textarea");

    textArea.style.position = 'fixed';
    textArea.style.top = 0;
    textArea.style.left = 0;

    // Ensure it has a small width and height. Setting to 1px / 1em
    // doesn't work as this gives a negative w/h on some browsers.
    textArea.style.width = '2em';
    textArea.style.height = '2em';

    // We don't need padding, reducing the size if it does flash render.
    textArea.style.padding = 0;

    // Clean up any borders.
    textArea.style.border = 'none';
    textArea.style.outline = 'none';
    textArea.style.boxShadow = 'none';

    // Avoid flash of white box if rendered for any reason.
    textArea.style.background = 'transparent';

    textArea.value = copyText.innerHTML;
    document.body.appendChild(textArea);

    textArea.select();

    try {
        var successful = document.execCommand('copy');
        var msg = successful ? 'successful' : 'unsuccessful';
        console.log('Copying text command was ' + msg);
        showAlert('Page Code Copy', 'Page Code Copy Successful !!', 2, 2000);
    } catch (err) {
        console.log('Oops, unable to copy');
    }

      document.body.removeChild(textArea);

    /* Select the text field */
    //copyText.select();
    //copyText.setSelectionRange(0, 99999); /* For mobile devices */

    /* Copy the text inside the text field */
    //navigator.clipboard.writeText(copyText.innerHTML);
    //showAlert('Report Copy', 'Report Copy Successful !!', 2, 2000);
}

참고

https://gist.github.com/vitsalis/1b44302d92213d0a09128a4284f15ad6

내용

html 페이지를 복사 이후 메일내용에 첨부하고 싶을때,

렌더링된 이후 페이지와 동일한 형태를 클립보드에 복사하여 붙여넣기


방법

html

<div id="test_div" name="test_div">
      ~~~~~~~~
</div>


javascript

function page_page(){

    var htmlEditor = document.getElementById("test_div")

    var container = document.createElement('div')
    container.innerHTML = htmlEditor.outerHTML
    container.style.position = 'fixed'
    container.style.pointerEvents = 'none'
    container.style.opacity = 0
    document.body.appendChild(container)
    window.getSelection().removeAllRanges()
    var range = document.createRange()
    range.selectNode(container)
    window.getSelection().addRange(range)
    document.execCommand('copy')
    document.body.removeChild(container);

    showAlert('Page Copy', 'Page Copy Successful !!', 2, 2000);
}

참고

https://stackoverflow.com/questions/62833657/is-there-any-way-to-copy-the-rendered-html-of-a-div

내용

html page를 이미지 형태로 변환하여 저장 or 확인하는 기능


방법

html2canvas 사용


html

<!-- jQuery -->
<script src="~/plugins/jquery/jquery.min.js"></script>
<!-- html2canvas -->
<script src="~/plugins/html2canvas/html2canvas.min.js"></script>


<div id='myCanvas' class='target' style='border:1px solid gray;width:200px;height:200px'>
    <div style='border:1px solid green;width:180px;height:250px'>Hello world</div>
</div>


javascript

    saveAS 함수를 생성해두고 호출하는 방식

    canvas_height, canvas_widtht 의 경우 설정하지 않아도 상관없으나, 옵션 설정 방법을 위해 작성됨

function saveAs(uri, filename) {
    var link = document.createElement('a');
    if (typeof link.download === 'string') {
        link.href = uri;
        link.download = filename;
        document.body.appendChild(link);
        link.click();
        document.body.removeChild(link);
    }
else {
        window.open(uri);
    }
}

function page_snapshot()
{
    const canvas_height = document.querySelector('#myCanvas').offsetHeight
    const canvas_widtht = document.querySelector('#myCanvas').offsetWidth

    html2canvas(document.querySelector("#myCanvas"),{"width": canvas_widtht, "height": canvas_height}).then(canvas => {
        canvas_filename = 'myCanvas_img.jpeg'
        saveAS(canvas.toDataURL("image/jpeg"), canvas_filename);
    });
}

참고

https://lts0606.tistory.com/270

https://html2canvas.hertzen.com/

https://every-time-i-pass-this-place.tistory.com/entry/html2canvas-%EC%82%AC%EC%9A%A9%EB%B2%95-%EC%BA%A1%EC%B2%98%EB%A5%BC-%EC%9D%B4%EB%AF%B8%EC%A7%80%EB%A1%9C-%EB%8B%A4%EC%9A%B4%EB%A1%9C%EB%93%9C

1. <div> 태그란?

<div>tag란 division, 분할, 분배, 분류를 뜻합니다. html 안에 존재하는 여러 개의 태그들을 <div>라는 큰 단위로 묶어주는 주머니 역할을 한다. 큰 단위인 <div>로 묶어주면, 나중에 css로 <div>에만 수식을 해도 <div>태그 안에 속해있는 태그들이 모두 같은 명령을 받아 동일하게 적용된다.

만약 코드가 1,000줄이 넘고 코드도 다른 코드 30개들이 있는데 여기에 모두 동일한 효과를 적용시켜야 된다고 하면, 코드 하나하나에 효과를 넣는 게 아니라 <div> 태그로 묶어 나중에 css로 30여 개의 코드에 동일한 효과를 적용시킬 때 사용한다.

<div> 태그는 block level element (블록 라벨 엘리먼트)라 해당하는 코드의 행 전체를 차지한다. 다만, <div> 태그는 이렇게 묶어주는 주머니 역할이기 때문에 <div>태그 자체로는 시각적인 변화를 나타낼 수 없다.


2. <span> 태그란?

<span> 태그도 <div>태그와 같이 여러 개의 태그들을 묶어주는 주머니 역할을 한다. <span>태그는 inline element (인라인 엘리먼트)라 자신의 content 만큼 공간을 차지한다. <span> 태그는 이렇게 묶어주는 주머니 역할이기 때문에 <span>태그 자체로는 시각적인 변화를 나타낼 수 없다.

3. <div>, <span> tag 출력하기

■ <div> tag 출력하기

<div> 텍스트 텍스트 </div>

■ <span> tag 출력하기


<span> 텍스트 텍스트 </span>

4.<p>, <div>, <span>tag의 차이점

<p>, <div>, <span> 태그가 뭐가 다른 건지 의문을 품게 될 때가 있다. 웹 제작 수업 선생님께 여쭤보니 아래처럼 가르쳐주셨다. 궁금하셨던 분들은 참고하시면 좋을듯하다.

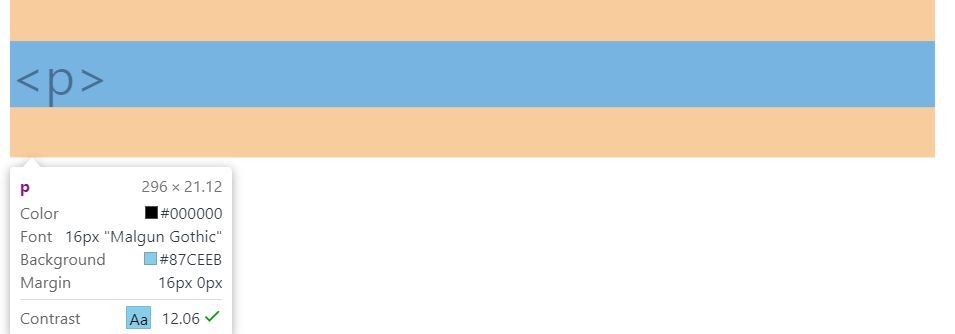
■ <p> : 문단 분량의 content + 상하 margin이 있음

▲ <p> tag css box 조회화면 / 파란색 : content, 주황색 : margin

■ <div> : block level element (블록 라벨 엘리먼트) - 화면 전체를 쓰는 애들. content에 해당하는 <div>라는 텍스트가 행 전체를 차지하고 있다.

▲ <div> tag css box 조회화면 / 파란색 : content

■ <span> : inline element (인라인 엘리먼트) - 자기 content 만큼의 테두리를 쓰는 애들. content에 해당하는 <span>이라는 텍스트가 자기만큼의 공간을 차지하는 것을 볼 수 있다.

내용

이벤트 발생 시점 div 에 정의된 내용을 출력 or 숨김 하고 싶은 경우


방법

html

<div class="row" id="test_div">
          ~~~~~
</div>


javascript

화면 출력
document.getElementById("test_div").style.display = "";

화면 숨김
document.getElementById("test_div").style.display = "none";

참고

https://www.w3schools.com/jsref/prop_style_display.asp


내용

일시적으로 실행을 멈추거나, 일정 시간동안 실행을 지연시키는 기능


방법

setTimeout( 실행 명령어, 지연 시간(마이크로초) )

'after'를 출력하는 문구는 3초후에 실행이됨, 하지만 'done' 문구가 먼저 출력된 이유는 javascript는 기본적으로 프로그램 실행을 막지 않는(non-block)방식이라 다음 코드가 먼저 실행됨

console.log("before");
setTimeout(() => console.log("after"), 3000);
console.log("done!");

-- 결과 --

before
done!
after


Promise 를 사용한 sleep( 지연 시간(마이크로초) ) 

비동기 지연

function sleep(ms) {
  return new Promise((r) => setTimeout(r, ms));
}

console.log("before");
sleep(3000)
  .then(() => console.log("after"))
  .then(() => console.log("done!"));

-- 결과 --

before
after
done!


참고

https://www.daleseo.com/js-sleep/


to Top